Known for its fast speed runtime engine, NodeJS becomes problematic when you try to find bugs and errors. On top of that, you might also bump into issues leading to subpar performance, such as: sub-optimal db query, inefficient algorithms, or using libraries the wrong way.
Since we work with NodeJS on a regular basis, we put together this tutorial about debugging and improving performance in NodeJS applications. It is the complete guide for developers aiming to fine-tune their nodeJS projects for better overall performance and speed. Let's see how we will go about it.
1. How to Improve Performance in NodeJS Apps
1.1. Use Caching With Redis
Caching is the process of storing a copy of data, which serves when requested.
We can use caching with Redis and NodeJS. Redis is an open-source, in-memory database, it supports data structures like strings, hashes, lists, sets, sorted sets with range queries, bitmaps, and streams.
To demonstrate the purpose of using cache, we are using free cocktail-db api and get cocktail details of given id.
const express = require("express");
const redis = require("redis");
const axios = require("axios");
const bodyParser = require("body-parser");

//setup port constants
const port_redis = process.env.PORT || 6379;
const port = process.env.PORT || 5000;

//configure redis client on port 6379
const redis_client = redis.createClient(port_redis);

//configure express server
const app = express();

//Body Parser middleware
app.use(bodyParser.urlencoded({ extended: false }));
app.use(bodyParser.json());

//  Endpoint:  GET /cocktail/:id
//  @desc Return cocktail data for particular cocktail id
app.get("/cocktail/:id", async (req, res) => {
  try {
    const { id } = req.params;
    const cocktail = await axios.get(
      `https://www.thecocktaildb.com/api/json/v1/1/lookup.php?i=${id}`
    );

    //get data from response
    const cocktailData = cocktail.data;

    return res.json(cocktailData);
  } catch (error) {
    console.log(error);
    return res.status(500).json(error);
  }
});

app.listen(port, () => console.log(`Server running on Port ${port}`));
We have created the sample API where the endpoint cocktail/{id}, now we run the server to check execution time.
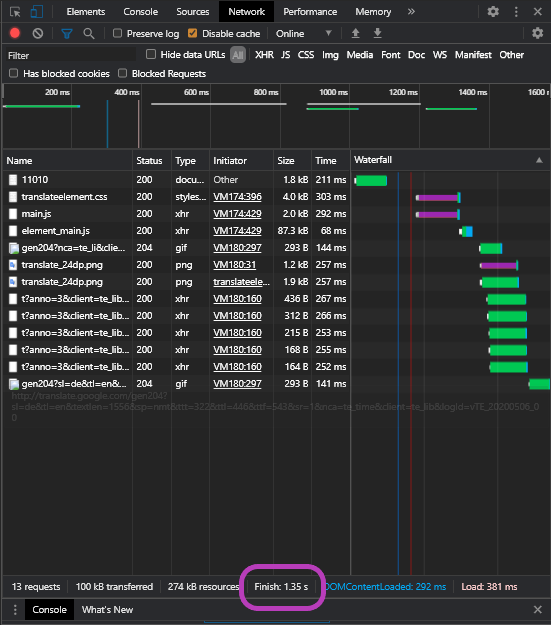
The time it takes a query to finish is 1.74 sec, now let's do it using Redis.
First, we create the Redis client:
const redis_client = redis.createClient(port_redis);
Then from the following command we can set data to redis:
redis_client.setex(id, 3600, JSON.stringify(cocktailData));
Next we have to use express middleware to check if the data exists in cache:
checkCache = (req, res, next) => {
  const { id } = req.params;

  redis_client.get(id, (err, data) => {
    if (err) {
      console.log(err);
      res.status(500).send(err);
    }
    //if no match found
    if (data != null) {
      res.send(data);
    } else {
      //proceed to next middleware function
      next();
    }
  });
};
This code checks if the requested id data is present in redis cache, then sends the data from cache. Let's check again by executing the same query.
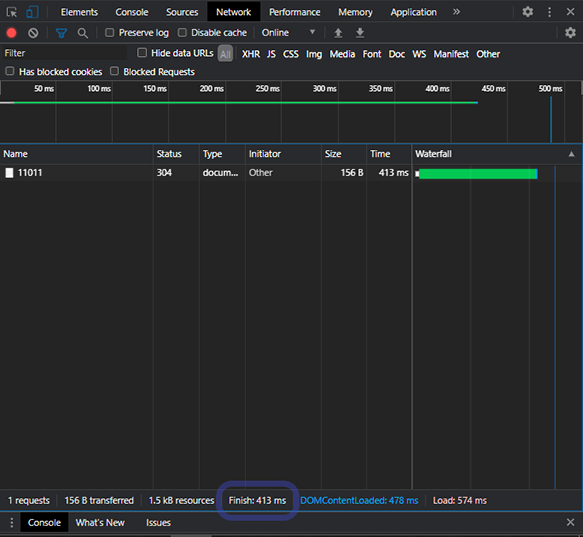
See the power of caching? It increases performance and delivers better user experience.
Now we've got the final code for Redis implemented:
const express = require("express");
const redis = require("redis");
const axios = require("axios");
const bodyParser = require("body-parser");

//setup port constants
const port_redis = process.env.PORT || 6379;
const port = process.env.PORT || 5000;

//configure redis client on port 6379
const redis_client = redis.createClient(port_redis);

//configure express server
const app = express();

//Body Parser middleware
app.use(bodyParser.urlencoded({ extended: false }));
app.use(bodyParser.json());

checkCache = (req, res, next) => {
  const { id } = req.params;

  redis_client.get(id, (err, data) => {
    if (err) {
      console.log(err);
res.status(500).send(err);
    }
    //if no match found
    if (data != null) {
      res.send(data);
    } else {
      //proceed to next middleware function
      next();
    }
  });
};

//  Endpoint:  GET /cocktail/:id
//  @desc Return cocktail data for particular cocktail id
app.get("/cocktail/:id", async (req, res) => {
  try {
    const { id } = req.params;
    const cocktail = await axios.get(
      `https://www.thecocktaildb.com/api/json/v1/1/lookup.php?i=${id}`
    );

    //get data from response
    const cocktailData = cocktail.data;

    //add data to Redis
    redis_client.setex(id, 3600, JSON.stringify(cocktailData));

    return res.json(cocktailData);
  } catch (error) {
    console.log(error);
    return res.status(500).json(error);
  }
});

app.listen(port, () => console.log(`Server running on Port ${port}`));
1.2. How to Do Query Optimization
In NodeJS, we create a backend so we can communicate with the database and populate the db data into the frontend. While these queries consume time, the good news is we can optimize the process to improve performance and user experience in a NodeJS app. Let’s take an example.
SELECT * FROM marvel WHERE superhero = “Green Latern”;
This query is looking for superhero Green Latern from a Marvel table. It is a simple and straightforward query. It can give you the exact result that is required but think about the table that stores thousands of records.
Database applies linear search - if for instance your record is last, this query will have to search the whole table until the last row. We have to optimize this query by creating an index which has an exact copy of the table, with items sorted 'ascending by author', then by applying binary search.
Binary search is an efficient algorithm that divides the sorted list into half and looks for the half where the data can potentially be found. This process continues until the exact data is found.
Always look for your query to be optimized. Even though it adds complexity to the developer side, it ultimately gives the user a better experience.
You can also learn about GraphQL which works by contrast to RestAPI: you define the structure of what you want from the tables and you get the exact structure of data in the backend.
At Around25 we always perform query optimizations in order to deliver fast, scalable apps in NodeJS. Click below to see what our clients think and contact us here if you are building your project with NodeJS.
1.3. What is Event Loop Latency and how it can Slow down your App
Event loop latency measures the time it takes to complete a task scheduled with setTimeout(T). High-loop latency means an event loop that is busy with processing callbacks. It enables NodeJS to perform non-blocking I/O Operation, by offloading operations to the system kernel wherever possible.
NodeJS is a single-threaded language, and one operation can block the execution until it completes its operation. There are two types of instructions that are simple and blocked. Simple instructions like a=a+2 don’t impact application performance since they consume milliseconds.
On the other hand, blocked operations like crypto.randomBytes(128).toString('base64') consume minutes of work, so they impact application performance and block the event loop for other operations. If we use a blocked operation synchronously then we are prolonging the event loop latency and diminishing our application performance. Let's take an example:
function createProfile(pass) {
  try {
    const salt = crypto.randomBytes(128).toString("base64");
    const hash = crypto.pbkdf2Sync(pass, salt, 10000, 512, "sha512");

    return hash;
  } catch (err) {
    console.log(err);
  }
}
This function blocks the event loop till its execution and using plain is not an option. Instead, we can use an async function which runs this function asynchronously and doesn't block the main thread that will be used for next code execution. Async API can be used as such:
async function createProfile(pass) {
  try {
    const salt = crypto.randomBytes(128).toString("base64");
    const hash = crypto.pbkdf2Sync(pass, salt, 10000, 512, "sha512");

    return await hash;
  } catch (err) {
    console.log(err);
  }
}
The higher the event loop latency is, the worse your app will perform. So you might want to use tools like Flamechart or Dynatrace for visualizing and managing your event loop latency.
1.4. How to Use Synchronization
As Javascript is single-threaded and nothing can be done in async, this means a long time to execute a program. So you have to define your work asynchronously, this way your complex function works in the background while also processing the next step.
Promise is a feature that reduces complexity in defining asynchronous functions. It also helps in escaping callback. Let's take an exampe in Promise, to understand what async/await does.
const axios = require("axios");

function getFromGitHub() {
  const userName = "zarakM";
  const url = "https://api.github.com/users";

  axios(`${url}/${userName}/repos`)
    .then((reposResponse) => {
      return reposResponse.data;
    })
    .then((userRepos) => {
      console.log(userRepos);
    })
    .catch((err) => {
      console.log(err);
    });
}
getFromGitHub()
The URL endpoint is hit, it waits for promise to resolve, and when reposResponse is ready we can return response data then log the result. This way, it waits for each step to complete then moves to another and if an error occurrs, the catch function will print the error.
Now we can try the same example with async/await.
const axios = require("axios");

async function getFromGitHub() {
  try {
    const userName = "zarakM";
    const url = "https://api.github.com/users";
    const reposResponse = await axios.get(`${url}/${userName}/repos`);
    const userRepos = await reposResponse.data;

    console.log(userRepos);
  } catch (error) {
    console.log(error);
  }
}

getFromGitHub()
Instead of using promise we use await, it waits for the response then moves to the next line and if an error occurs, the catch block will execute. Now our code is more readable. Using asynchronization is what makes NodeJS work faster.
1.5. How to Use Prometheus and Grafana to monitor and discover memory leaks
Prometheus scrapes the metrics and Grafana is a beautiful visualization tool. Together, they work to improve visualization and monitoring (a detailed guide here).
To implement memory leak monitoring in prometheus, you will need to install prom-client and prometheus-gc-stats packages. Prometheus-gc-stats package helps to automatically collect garbage stats. We create express application with custom counters:
const { collectDefaultMetrics, register, Counter } = require('prom-client');
const gcStats = require('prometheus-gc-stats');
const express = require("express");
register.setDefaultLabels({
  app: 'around25',
});

// Initializing the express app
const app = express();

// Set prom-client to collect default metrics
collectDefaultMetrics({ timeout: 5000 });

// Set prometheus-gc-stats to collect GC stats
gcStats()();

// Custom metric - Counter for counting the number of requests
const totalRequests = new Counter({
  name: 'http_requests_total',
  help: 'Total number of requests',
  labelNames: ['method', 'hostname'],
});

app.use((req, res, next) => {
  totalRequests.inc({ method: req.method, hostname: req.hostname });
  next();
});

// Handle the metrics scraping on /metrics path
app.get('/metrics', (req, res) => {
  res.set('Content-Type', register.contentType);
  res.end(register.metrics());
});

// Starting the app
app.listen(8800);
Then start the server with node main.js.
After that we can use prometheus with its docker image and configure it through a YAML file. YAML file content:
//prometheus.yml file name

global:
  scrape_interval: 5s
scrape_configs:
  - job_name: "example-nodejs-app"
    static_configs:
      - targets: ["docker.for.win.localhost:8800"]
You can change the target if you are not using windows. For mac, you can use docker.for.mac.host.internal and for Linux you can use localhost. It scrapes metric every 5s. Next we run docker image with the following command.
docker run --rm -p 9090:9090 -v "{pwd}prometheus.yml:/etc/prometheus/prometheus.yml" prom/prometheus:v2.20.1
You can change pwd with your present working directory where the yml file resides.
Install Grafana and access the dashboard at localhost:3000. Hit the endpoint enter credential and set datasource as prometheus.
Then click on prometheus, enter URL http:/localhost:9090, leave the remaining and save it. After that, click 'create dashboard' and 'create panel' on the top right side. We used heap memory to evaluate how much is used and the total allocated.
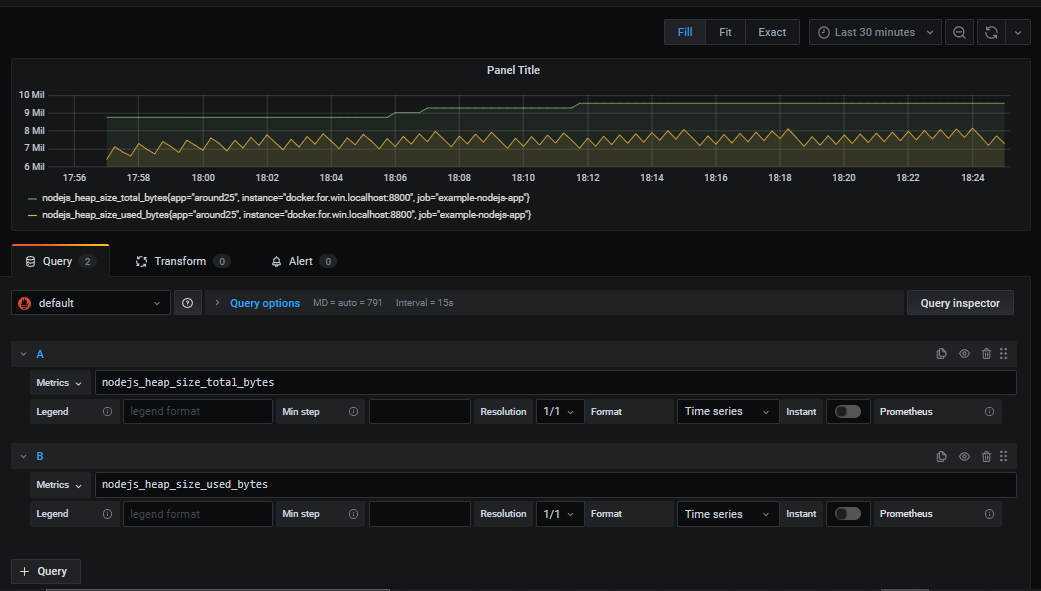
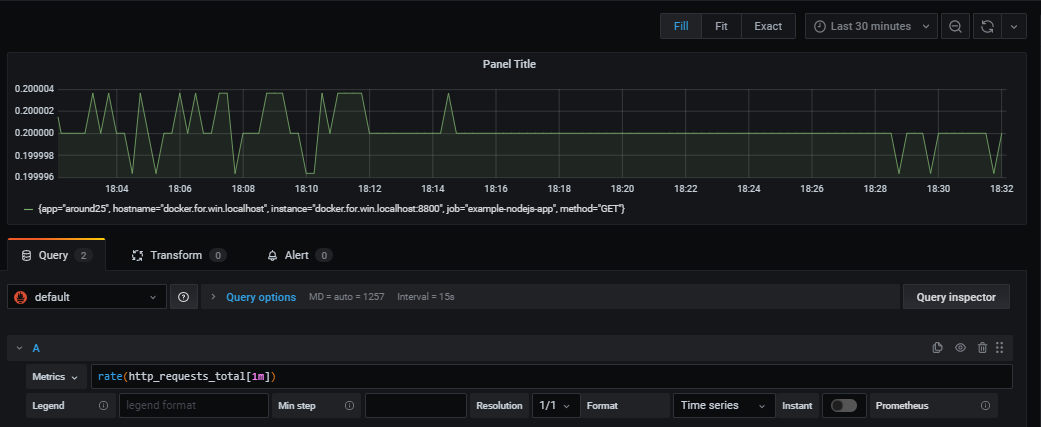
You can create as many graphs as you want from different metrics to compare values and check for the data leaks. We have also created a custom metric ‘http_requests_total’.
2. How to Debug a NodeJS App
2.1. Different Console Types
You have seen console.log() everywhere, but there are other types of console that make sense for our task, as you will learn from this chapter.
Console.group
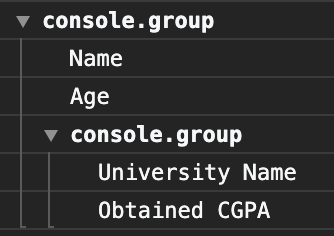
Using the group method helps you organize the output of the same messages. console.group is used to create a nested block and console.groupEnd to break this nested group. If we write this:
console.group();
console.log("Name")
console.log("Age")
console.group()
console.log("University Name")
console.log("Obtained CGPA")
console.groupEnd()
console.groupEnd()
...we get this:
Console.trace
You can use console.trace() to get a stacktrace at a specific point of code execution. It is an in-built interface of the console module. The console trace method accepts the first argument as a string and it is the message used to print the message at start.console.trace("A simple stack trace") gives us this output:
Trace: hello
at Object.<anonymous> (E:\udacity\Student projects\around25\test.js:10:9)
at Module._compile (internal/modules/cjs/loader.js:1147:30)
at Object.Module._extensions..js (internal/modules/cjs/loader.js:1167:10)
at Module.load (internal/modules/cjs/loader.js:996:32)
at Function.Module._load (internal/modules/cjs/loader.js:896:14)
at Function.executeUserEntryPoint [as runMain] (internal/modules/run_main.js:71:12)
at internal/main/run_main_module.js:17:47
If we want to get the stack trace of the error earlier, we use
var trace= new Error().trace
console.log(trace)
Now we can just call console.trace("trace"). This console type makes code easy to debug when developing in NodeJS.
Console.table
Console.table takes an array of data and puts them in the table. It can make the logs more readable by adding an index if it is an array or property name if it is an object.
For our example we take console.table(["i3","i5","i7","i9"]), which gets us this output:
| (Index) | Values |
|---|---|
| 0 | 'i3' |
| 1 | 'i5' |
| 2 | 'i7' |
| 3 | 'i9' |
If the input is an object, then
function Info(Name, age) {
  this.Name = Name;
  this.age = age;
}

var person = new Info("Zarak", "18");
console.table(person);
So our output looks like this now:
| (Index) | Values |
|---|---|
| Name | 'Zarak' |
| Age | '18' |
Console.debug and Console.info
Console.debug and Console.info are doing the same work of taking input of string or object and displaying it, but using debug and info separates the logs in the console.
You can filter the logs you want to display by choosing either: verbose, debug, info, warning or error. This separation makes the console readable and you can get the exact level of logs you need.
2.2. How to Debug from IDE
You can debug your application from within your IDE. For this article, we will do this in VScode IDE.
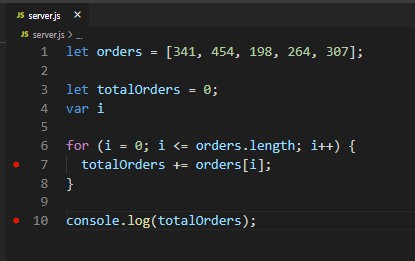
First, take a look at the sample code and the output, then we will start debugging to find out where the problem is.
let orders = [341, 454, 198, 264, 307];

let totalOrders = 0;
var i;

for (i = 0; i <= orders.length; i++) {
  totalOrders += orders[i];
}

console.log(totalOrders);
Output: NaN
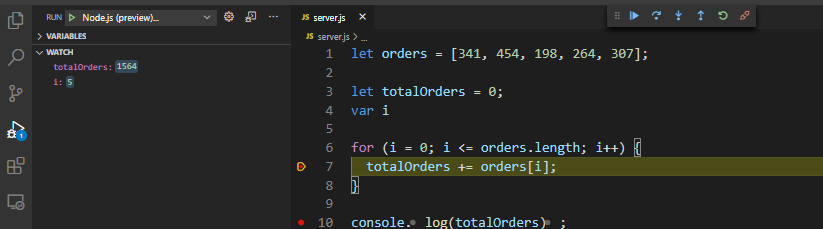
Let’s start debugging, by clicking on ‘create javascript debug terminal’.
After that, we create debugging points where we want the application to stop and you can see where the problem lies.
We created breakpoints at lines 7 and 10 to pause the execution so we can continue until we find the error.

Now start the server with this command: Node server.js.
At the first iteration, the value of totalOrders is 341. We can fast-forward the program and see what we get at the fifth iteration:
We are getting the result we expected, now let’s run it one more time.
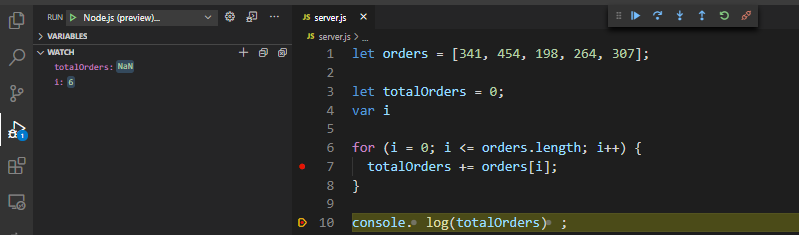
You get a NaN error, which indicates that we have an array of 5 but we are iterating loops 6 times and orders[5] have no value, that’s why the program breaks.
2.3. How to Use Postman
Postman helps API development as well as API debugging. To see how it works, we create a sample API in NodeJS.
const express = require("express");
const bodyParser = require("body-parser");

const users = [];

const server = express();
server.use(bodyParser.json());

server.get("/getUsers", (_, response) => response.send({ users }))

server.post("/users", ({ body }, response) => {
  const { user } = body;
  console.log({body})
  users.push(user);
  response.send({ user });
});

server.listen(9999, () =>
  console.log("Server starts running at 9999 port")
);
We create the user by calling /users endpoint, then we get all users with /getUsers endpoint. For demonstration purposes, we utilized an array for the user’s storage.
Let’s create the user by calling the API and verify whether user creation is implemented correctly:
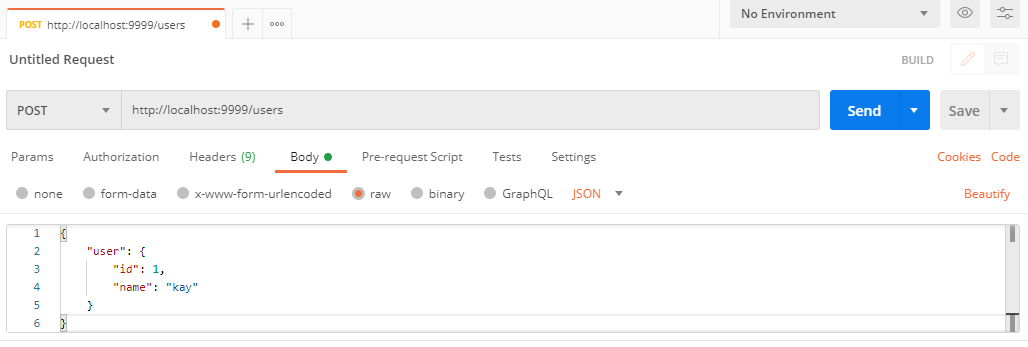
Click send to execute the query, and you get the response below that.
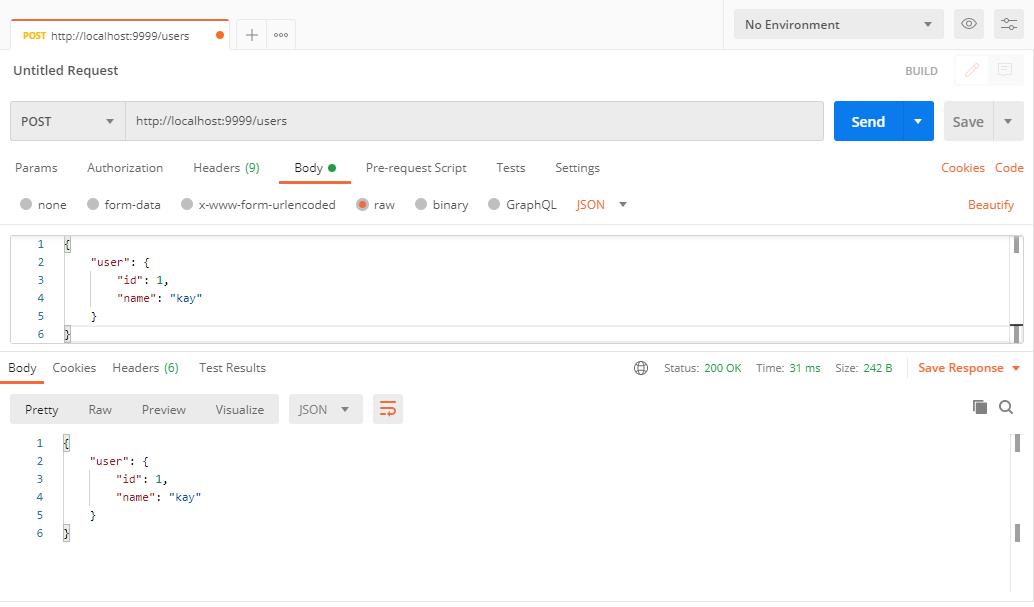
Now we can verify our /getUsers endpoint.
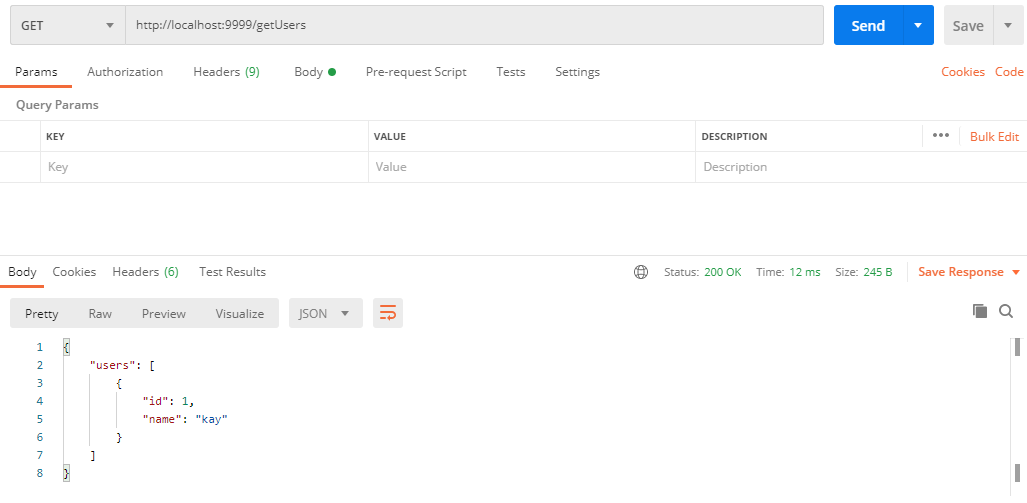
Here we use a simple API and debug it through Postman, which has a lot of options and makes it quite easy to use.
2.4. How to Use Code Linter
We can use a code linter such as ESLint to check for syntax and problems. Let's say we have a variable but never used it, as it makes no sense to declare a variable that can’t be used in the program.
To illustrate this, we have a small piece of code where we use the name variable but not the age variable and use ESLint to detect this problem.
// file name server.js
var name = 'zarak'
var age = 17

console.log(name)
You can use eslint from the eslint server.js command.
Output will be
3:5  error  'age' is assigned a value but never used  no-unused-vars

✖ 1 problem (1 error, 0 warnings)
2.5. How to Do Test-Driven Development
Test-driven development (TDD) implies that development starts with creating a test and then implementing a feature which then passes that test.
Testing after development is troublesome and error-prone since we have to remember all the implementation details. It has become easier to debug using a test before development: if the test fails, we know where we need to refactor the code. Test-driven development follows this process:
- Write test.
- Implement code that passes the above test.
- Refactor.
Let’s look at an example of the TDD approach:
//test.js
const assert = require('assert')

describe(Multiply, function() {
    it('should test if 5*3 = 15', function(){
      assert.strictEqual(15, multiply(5,3))
    })
})
First, we created the test Multiply, which tests if the multiplication function is done correctly. For this, we describe what is used to group our test and if it is used for a specific test.
function multiply(operand_one, operand_two){
    return operand_one * operand_two
}

module.exports = multiply
After creating the test, we will implement the actual function to verify if the function is valid and passes the test.
Then run npm test to verify the test.
Output:
> mocha
  Multiply
    √ should test if 5*3 = 15
  1 passing (21ms)
Now it passes the test and asserts that multiplication is done correctly. The great thing about the tests is they are automated: you just need to hit npm test and you get all test results.
Conclusion
That's about it, we're done discussing methods of debugging and improving performance in a NodeJS application. So let's run down some key takeaways:
- You can use ESLint to verify our code syntax.
- Caching with Redis will improve performance and reduce load on the server.
- You can use Prometheus and Grafana to monitor applications.
We hope the article answered some of your questions about debugging and performance in NodeJS. Feel free to comment below if you have suggestions or to subscribe to our newsletter if you want similar materials in your inbox.