Before we explore the concept and implementation of Horizontal Pod Autoscaler (HPA) in Kubernetes, let’s try to understand autoscaling and why we need autoscaling, as well as what are types of autoscaling available in Kubernetes.
Autoscaling is not that hard to understand, so we will try to keep it short.
Types of Autoscaling in Kubernetes
When learning new stuff, it's always easier to understand by comparison - and for our case we will take AWS EC2 Autoscaling.
In AWS, we use the EC2 Autoscaling feature to scale the nodes up or down based on resource metrics like usage of CPU, memory, etc., whereas in Kubernetes we are scaling the number of pods based on metrics from the metrics server. There are different kinds of metrics that we can use in Kubernetes. In addition to that, Kubernetes also provides different types of autoscaling such as:
- Horizontal Pod Autoscaler: Adjusts the number of replicas of an application;
- Vertical Pod Autoscaler: Adjusts the resource requests and limits of a container;
- Cluster Autoscaler: Adjusts the number of nodes of a cluster.
All the above autoscaling types address different use cases and use different concepts. In this article, we will focus on Horizontal Pod Autoscaler. The Horizontal Pod Autoscaler can also be referred to as HPA.
What is HPA and where does it fit in the Kubernetes ecosystem?
There are several types of components in Kubernetes.
HPA is a controller and it lies in one of the components called 'kube-controller-manager' and is configured by HorizontalPodAutoscaler resource objects. HPA scales the number of pods in a replication controller, deployment, replica set or stateful set based on CPU utilization.
HPA can also be configured to make scaling decisions based on custom or external metrics.
When HPA is enabled, the controller monitors the resource usage of the pods continuously in order to determine whether it needs to adjust the number of pod replicas to optimally meet the current demand.
The HPA is implemented as a control loop, with a period controlled by the controller manager's --horizontal-pod-autoscaler-sync-period flag (with a default value of 15 seconds). Resources that can be scaled by the Horizontal Pod Autoscaler include Deployment, StatefulSet, ReplicaSet, and ReplicationController.
Note: The HPA does not work with DaemonSets.
Metrics Server
Metrics Server is a scalable, efficient source of container resource usage metrics for Kubernetes’ built-in autoscaling pipelines.
It collects resource metrics from Kubernetes and exposes them in the Kubernetes API server through Metrics API for use by Horizontal Pod Autoscaler.
There are three types of metrics server APIs:
- Resource Metrics API: Predefined resource usage metrics (CPU and memory) of Pods and Nodes;
- Custom Metrics API: Custom metrics associated with a Kubernetes object;
- External Metrics API: Custom metrics not associated with a Kubernetes object.
To configure the Autoscaling, we need to expose the scaling metric by using anyone of the above APIs from the metrics registry server.
Let’s assume that we have an application deployed in Kubernetes and configured HPA on it. HPA will follow this cycle of action:

What happens?
- HPA will continuously monitor the metrics server for resource usage.
- Based on the collected resource usage the HPA will calculate the desired number of replicas required.
- Then HPA takes a decision to scale up the application to the desired number of replicas.
- Finally, HPA changes the desired number of replicas.
Note: The default period of the control loop is 15 seconds.
The calculation of the desired number of replicas is based on the scaling metric and a user-provided target value for this metric.
Example:
Let's consider that the scaling metric is the CPU usage per replica:
- If the target value is 70% and the current value is 80%, the Horizontal Pod Autoscaler will scale up the number of pods to make the metric decrease and get closer to the target value which is 70%.
- If the target value is 70% and the current value is 40%, then the Horizontal Pod Autoscaler will decrease the number of pods to make the metric increase and get closer to the target value which is 70%.
Now, you might wonder what is the difference between the Horizontal Pod Autoscaler (HPA) and Vertical Pod Autoscaler(VPA) which we discussed earlier.
Difference between HPA and VPA?
| HPA | VPA |
|---|---|
| Horizontal scaling means increasing and decreasing the number of replicas. | Vertical scaling means increasing and decreasing the compute resources of a single replica. |
Advantages and Disadvantages of HPA
The biggest advantage is reduced cost. You don’t need to guess the number of nodes or pods needed to run your workloads. It scales up or down dynamically based on resource utilization, thus saving you money.
As for disadvantage, it may happen that very few pods are running on the node and still scale down, which may not happen because Cluster Autoscaler needs all of those pods for some reason or the other.
How to Implement the HPA?
To understand the implementation of HPA, let’s use an example where we will deploy a sample Apache and expose the PHP server.
Demo
Pre-requisites:
- This example requires a running Kubernetes cluster and kubectl, version 1.2 or later.
- Metrics server monitoring needs to be deployed in the cluster to provide metrics through the Metrics API.
- Horizontal Pod Autoscaler uses this API to collect metrics. To learn how to deploy the metrics-server, see the metrics-server documentation.
Implementation steps to perform:
- Create a docker container(Apache/PHP)
- Create a Kubernetes deployment
- Create a Kubernetes service
- Create the HPA
- Increase the Load
- Stop the Load
Create a Docker container
Create a custom Docker image that runs Apache and PHP. Then we will be using the PHP script provided on the Kubernetes website which will increase the CPU usage.
To make it simple, we already created the Docker image which contains the PHP script mentioned above. We can pull the Docker image from the Docker hub public repository given, like so:
$ docker pull karthikeyan819/k8s-container-images:HPA-demo-app
Also, make sure that you have this Docker image available:

Here, 'HPA-demo-app' is the name of a Docker image. We need to refer to this image from the worker Pod, and 'karthikeyan819/k8s-container-images' is the public repository from DockerHub.
So we are done with creating a sample application with a custom Docker image. Next, we need to create the Kubernetes deployment and run the container.
Create a Kubernetes deployment
To create the deployment in Kubernetes, first we need to connect to the Kubernetes cluster.
In order to access your Kubernetes cluster, kubectl uses a configuration file. The default kubectl configuration file is located at ~/.kube/config and is referred to as the kubeconfig file.
Example:
In our demo, the kubeconfig file is located below:
$ ls /home/user1/.kube/kubeconfig-demo-cluster
hpa-deployment-demo.yaml
Also we had set the KUBECONFIG environmental variable to the path of the kubeconfig file.
$ export KUBECONFIG=/home/user1/.kube/kubeconfig-demo-cluster
Note:
To make this change permanent, please add the export command in the ~/.bash_profile.
The above KUBECONFIG setup will provide us access to connect to the cluster. Now, let’s create a deployment:
$ pwd
/home/user1/demo/
$ vim demo-app-deployment.yaml
<copy the below contents and save the file>
To create the deployment kubernetes configuration:
apiVersion: apps/v1
kind: Deployment
metadata:
    name: hpa-demo-deployment
    labels:
        app: hpa-demo-deploy
    spec:
        replicas: 1
        strategy:
            type: RollingUpdate
        selector:
            matchLabels:
                app: hpa-demo-pod
        template:
            metadata:
                labels:
                    app: hpa-demo-pod
        spec:
            containers:
                - name: hpa-demo-container
                  image: HPA-demo-app:latest
                  imagePullPolicy: IfNotPresent

                  resources:
                      requests:
                          cpu: 500m              terminationGracePeriodSeconds: 0
Then, apply the changes:
kubectl apply -f demo-app-deployment.yaml
deployment.apps/hpa-demo-deployment created
We have created the deployment successfully, so let's list the deployment and oserve its status:

Creating the Kubernetes Service
Make sure you are still connected to the cluster and do this:
$ pwd
/home/user1/demo/

$ vim demo-app-service.yaml
<copy the below contents and save the file>

Service configuration

kind: Service
apiVersion: v1
metadata:
    name: demo-app-service
spec:
    selector:
        app: my-hpa-pod
    ports:
        - protocol: TCP
          port: 80
          targetPort: 8080
Then, apply the change:
kubectl create -f  demo-app-service.yaml
service/demo-app-service created
Now that we have created the service, we list it and observe its status:

How to Create the Horizontal Pod Autoscaler
Now that we have the server running with the demo application, let’s create the HPA by using the kubectl command:
The below configuration will create a HPA that maintains between 1 and 10 replicas of the Pods controlled by the hpa-demo-deployment which we created earlier.
Make sure you are connected to the cluster and create a file titled 'hpa-demo-deployment.yaml' and copy/paste the below configuration:
apiVersion: autoscaling/v1
kind: HorizontalPodAutoscaler
metadata:
    name: hpa-demo-deployment
spec:
    scaleTargetRef:
        apiVersion: apps/v1
        kind: Deployment
        name: hpa-demo-deployment
    minReplicas: 1
    maxReplicas: 10
    targetCPUUtilizationPercentage: 50
Here, we have:
kind - to create HPA we need to use the API, “HorizontalPodAutoscaler”.
minReplicas - minimum number of replicas the cluster can have.
maxReplicas - maximum number of replicas the cluster can have.
targetCPUUtilizationPercentage - CPU usage is used as a metric for the autoscaler.
Apply the changes, then you have:
$ kubectl apply -f hpa-demo-deployment.yaml
horizontalpodautoscaler.autoscaling/hpa-demo-deployment autoscaled
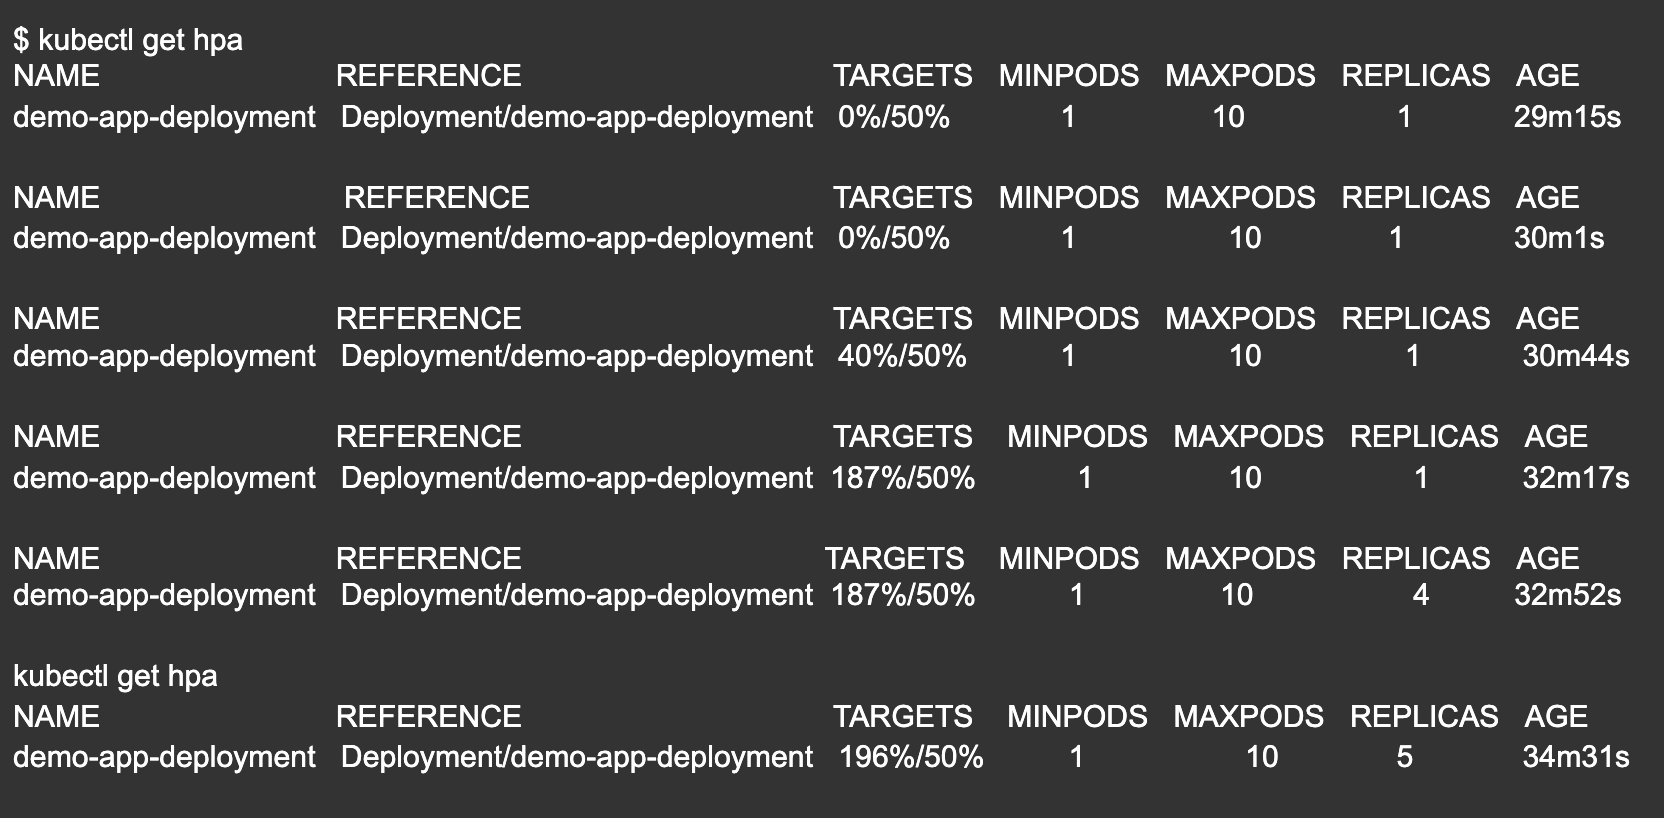
When checking the current status of autoscaler, we have:

Please note that the current CPU consumption is 0% as we are not sending any requests to the server (the TARGET column shows the average across all the pods controlled by the corresponding deployment).
Next, let’s increase the load and see the HPA in action!
Increasing the Load
Connect the Kubernetes cluster and open a new dedicated terminal. We are going to start a container and send an infinite loop of queries to the ‘demo-app-service’ service:
$ kubectl run -i --tty load-generator --rm --image=busybox --restart=Never -- /bin/sh -c "while sleep 0.01; do wget -q -O- http://hpa-demo-deployment; done"
Here, hpa-demo-deployment means your local IP address; if you don’t have DNS configured, please use the IP address of the master node. For better understanding, the above command is using the deployment name itself.
Now if you see status after a few minutes, we can then increase in CPU usage:
Stop the Load:
So far, we have tested our demo application where the pods are scaling up when the CPU usage spikes.
Now let’s stop the load and see whether the scaling down is working as expected. Ideally, when CPU usage goes down, the number of replicas should also be reduced.
Open the terminal which we used to run the load-generator and press <Ctrl + c> to terminate the process and wait for a minute or so.
Then list the HPA:

Here, the CPU usage is 0% and the HPA scaled down the number of pods back to minimum number 1.
Note: Autoscaling the replicas may take a few minutes.
Conclusion
Although autoscaling in Kubernetes can be implemented in several ways to handle the complex workload requirements, we have not even seen the tip of the iceberg with this topic.
The main advantage of autoscaling is we can make sure that resources are not over-provisioned, which gives us the flexibility to save the running costs without impacting the availability of the services.
So far we have discussed only HPA and other autoscaling types, and when it comes to selecting one of them, we need to pick based on the use-cases.